Introduction
In part 1 of this mini-series, we saw how to diagnose and correct the issues preventing an old computer game (Star Trek Armada) from starting on modern (Windows 7) systems. In part 2 we saw how to find the game loop and introduce our own code to slow it down so that the game’s native timing code would work properly.
This third and final post brings closure to the STA reverse engineering by enabling multiplayer saves and presenting a combined diff file for all of the patches we have made in this and the previous posts.
Fix #4 – Enabling Multiplayer Saves
Star Trek Armada is buggy; merely allowing the game to minimize (say, due to a screensaver turning on or alt-tabbing to another program) can cause it to crash. The game also suffers from multiplayer synchronization issues. Ideally, if we could figure out how to save and load multiplayer games, it would allow players in a multiplayer match to continue from a recent point when a problem occurs during gameplay.
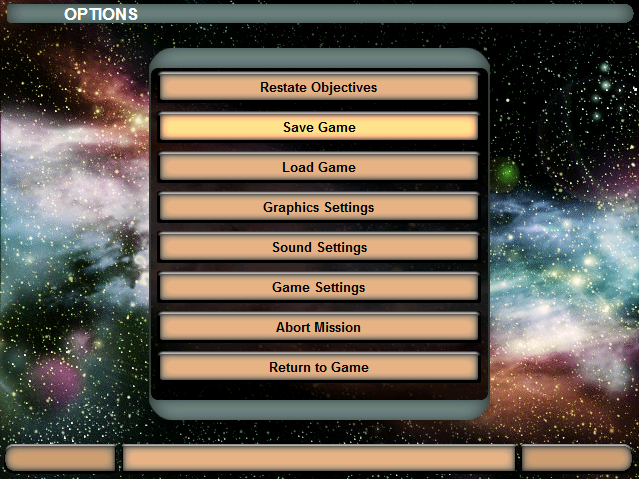
During a single player game, the game’s “options” menu is as follows:

During a multiplayer game, the game’s “options” menu is missing three buttons. In addition, a new button “surrender” is present:
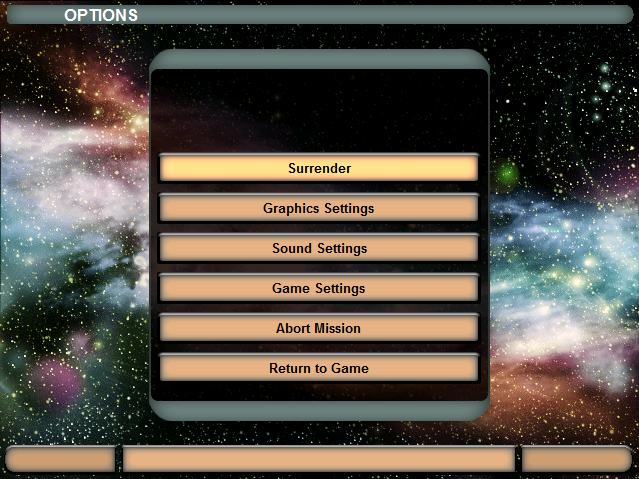
Considering that the menus are so similar, it is likely that one piece of code is handling both of the two possible “views.” If we can find this code, it will (hopefully) be a simple matter to “unhide” the save game button.
Finding the Menu Code
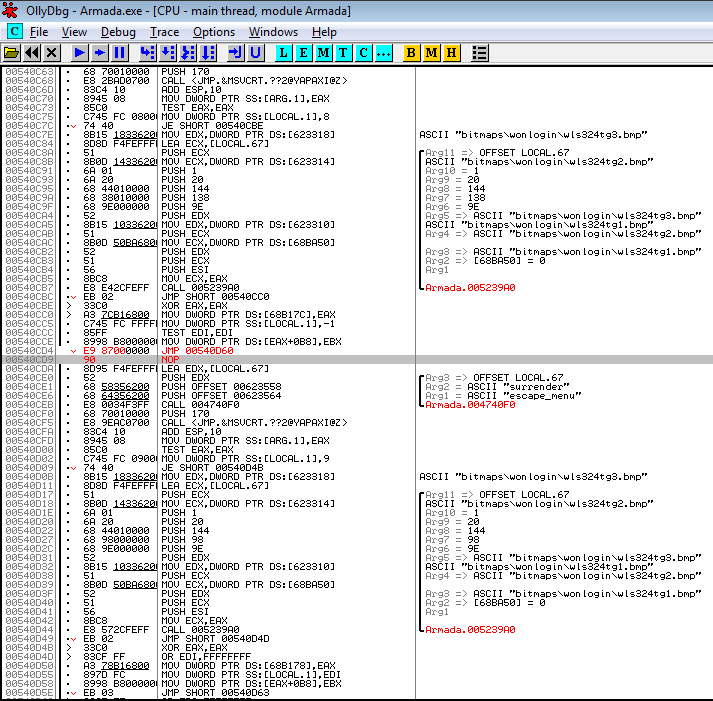
To start out, let’s try searching within Ollydbg’s memory dump pane for text strings used on the menu.
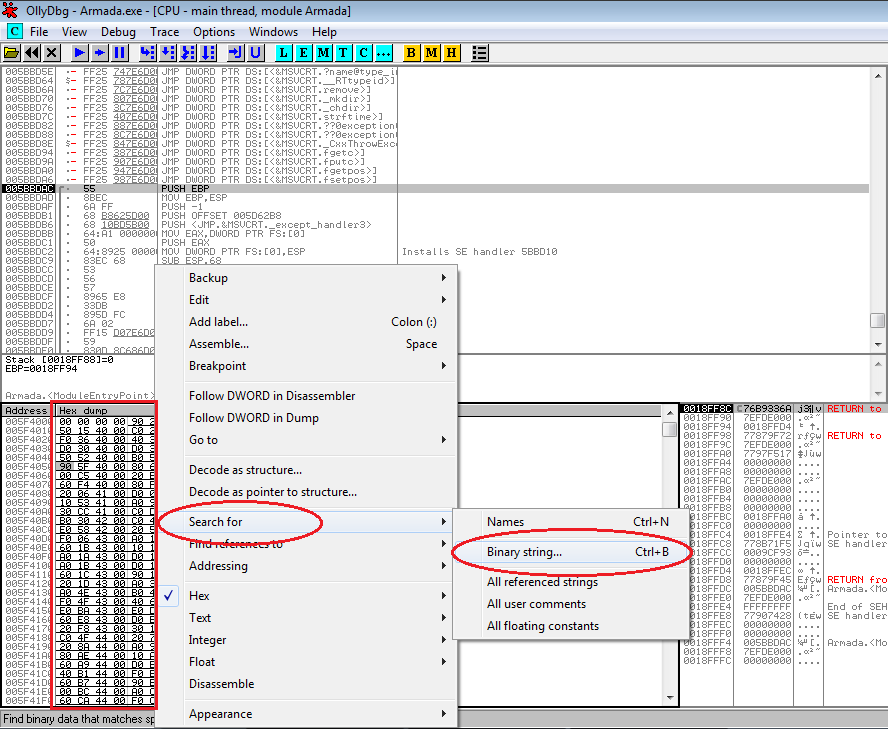
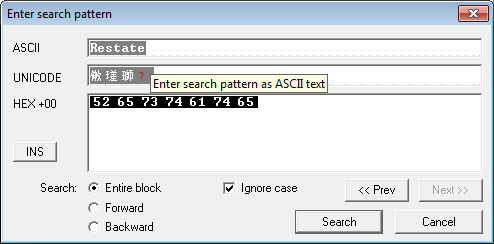
We need to choose a term that’s associated with the game’s menu system. It also needs to be a string unlikely to appear elsewhere in the code. After some trial-and-error, we search for the string “Restate” (for the the “Restate Objectives” button on the menu).
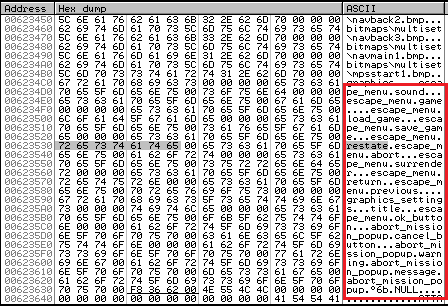
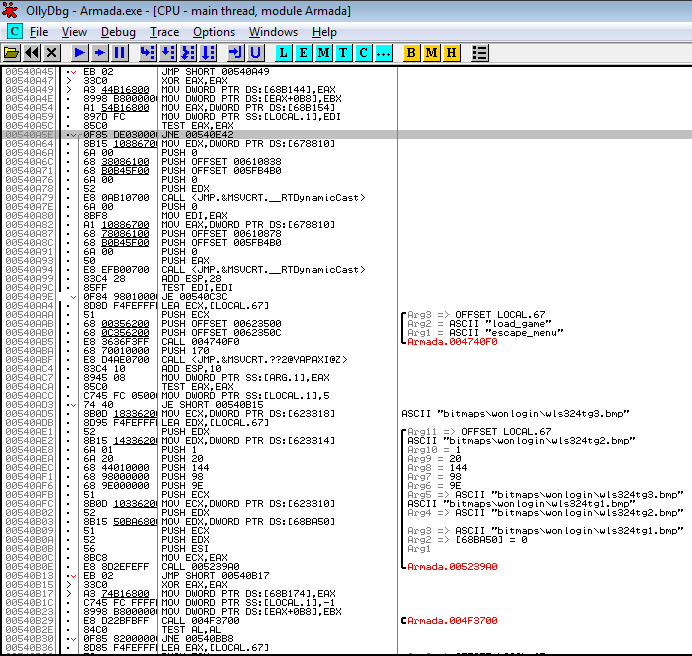
Looking at the results, we see the words “abort”, “surrender”, “save”, “load”, and “menu”. We appear to have found the game’s menu strings. We can find all code references to the associated menu “save game” text in the memory dump pane:
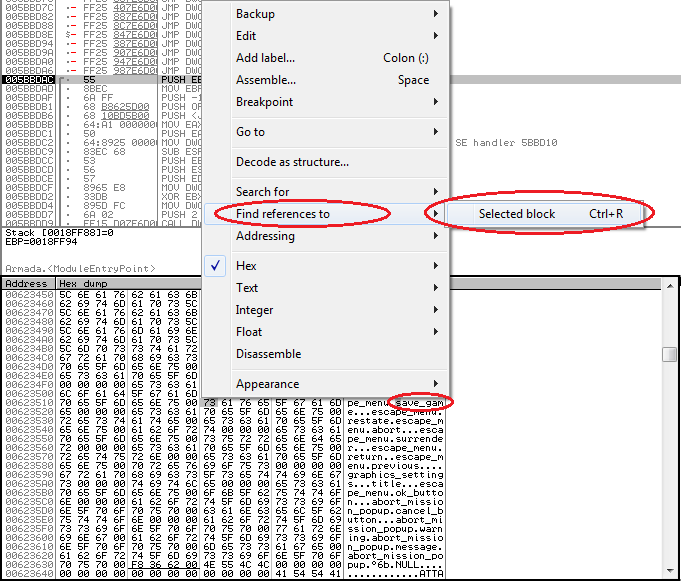
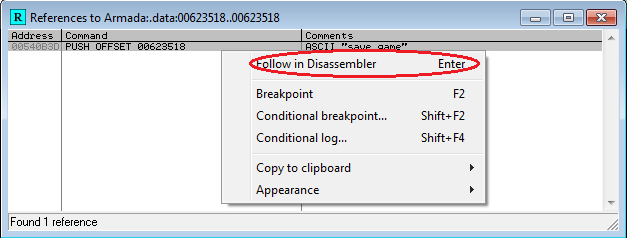
We trace to the single point in the code that references this string:
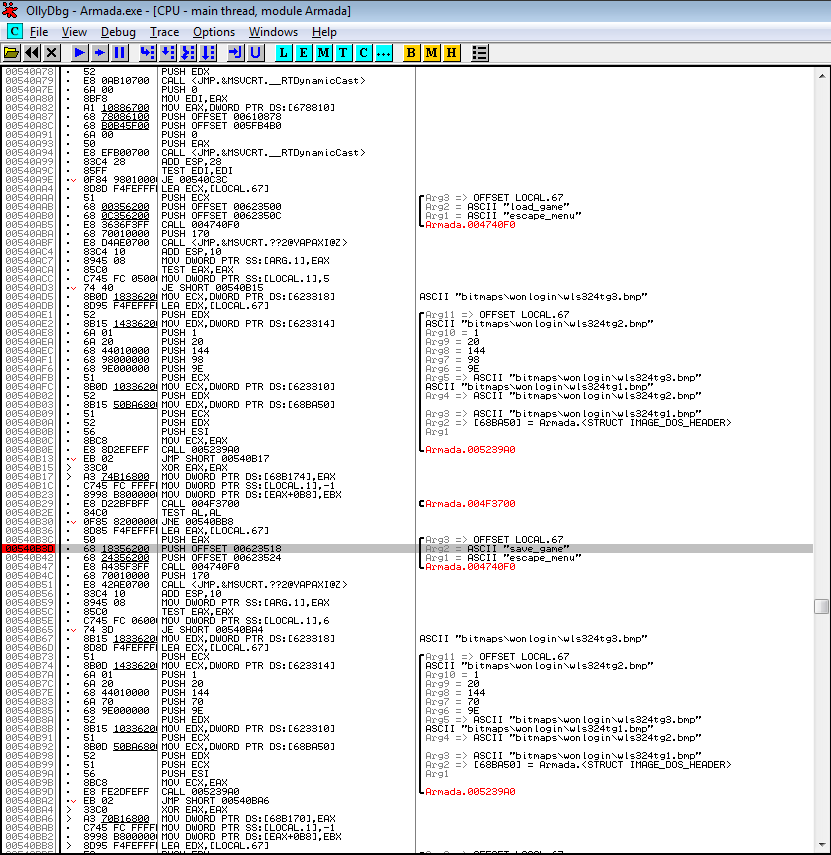
Setting a breakpoint and performing some testing confirms that this code is indeed activated when the game’s “options” menu is opened.
Analyzing the Menu Code
Scrolling up a bit from the reference to the “save game” text, we notice a “Case 110 (WM_INITDIALOG)” comment that Ollydbg has helpfully auto-generated for us.
Ollydbg was smart enough to notice that the assembly code in this (very large) function looks a lot like a big switch statement and filled in this comment (along with various others) during its automatic analysis. Olly also resolved the value of 110 to WM_INITDIALOG, which clues us in to the fact that this code related to the “save game” text is running to initialize our menu. Fantastic!
Setting a breakpoint and activating the menu confirms that the code is triggered upon menu display. Tracing through the code a little, we begin to see the menu’s components drawn on the screen and eventually reach the code (previously identified) that creates the “save game” and “load game” buttons.
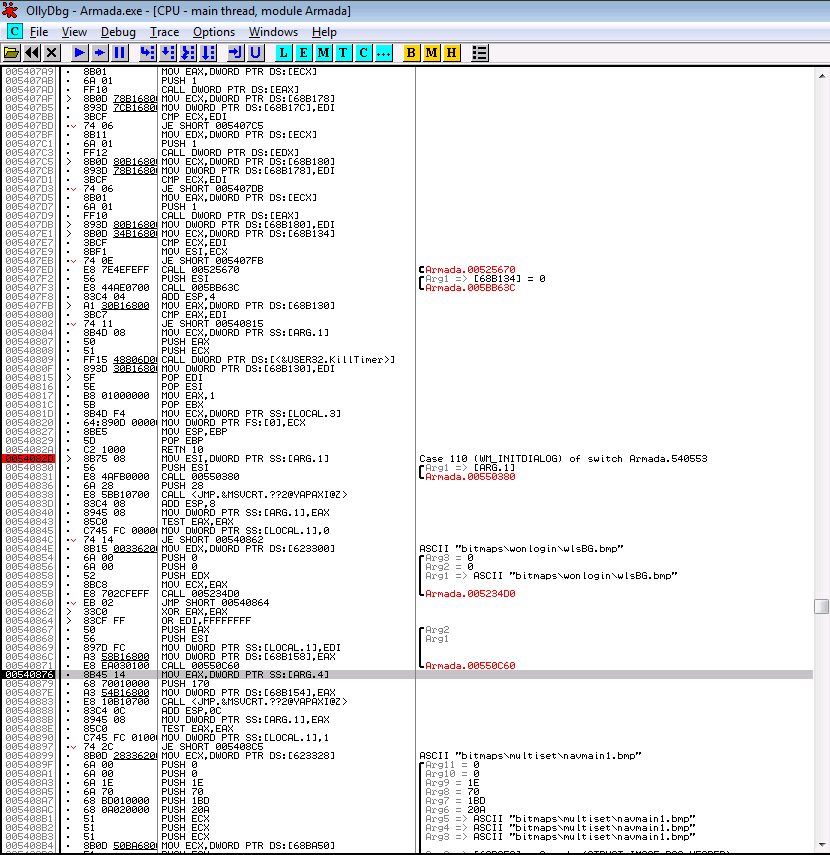
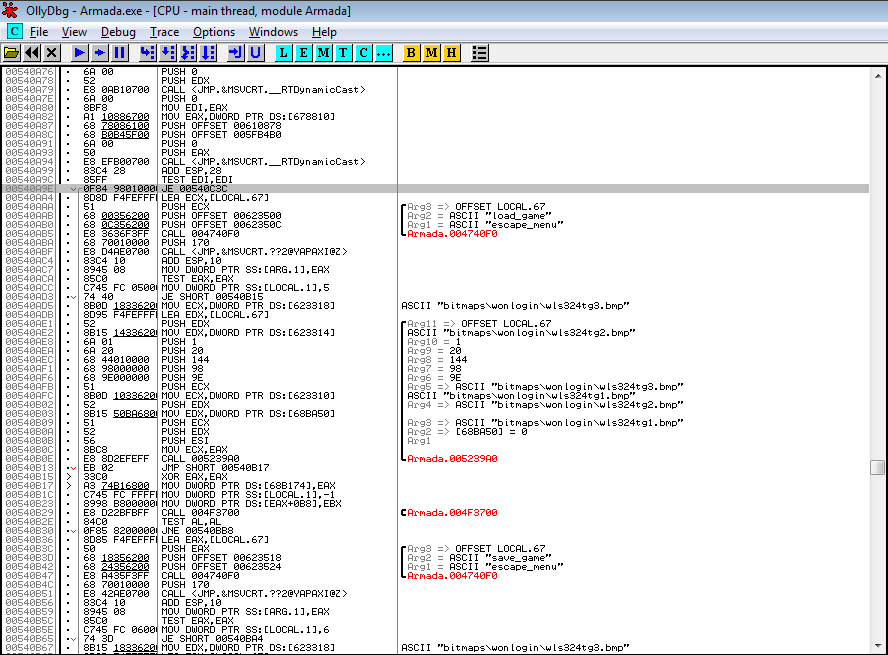
A little further down, we also see code initializing the “surrender” button existing inside the same “case WM_INITDIALOG” code block. Since the multiplayer menu configuration code and the single player menu configuration code both exist within this same block, the code must test and branch at one or more locations (within this overall block) to choose which menu configuration to produce. We’ll identify all branching instructions (with sufficiently-far jumps) within the WM_INITDIALOG block.
The first significant branch potentially jumps past both the code for “save game” and the code for “surrender”. This is unlikely to be the decision-point of interest to us:
The second significant branch potentially jumps past the code for load, save, and restate objectives. This sounds promising as these are the three buttons disabled in multiplayer mode:
The third significant branch potentially jumps past the code for surrender. Again, this sounds promising as the surrender button is disabled in single player mode:
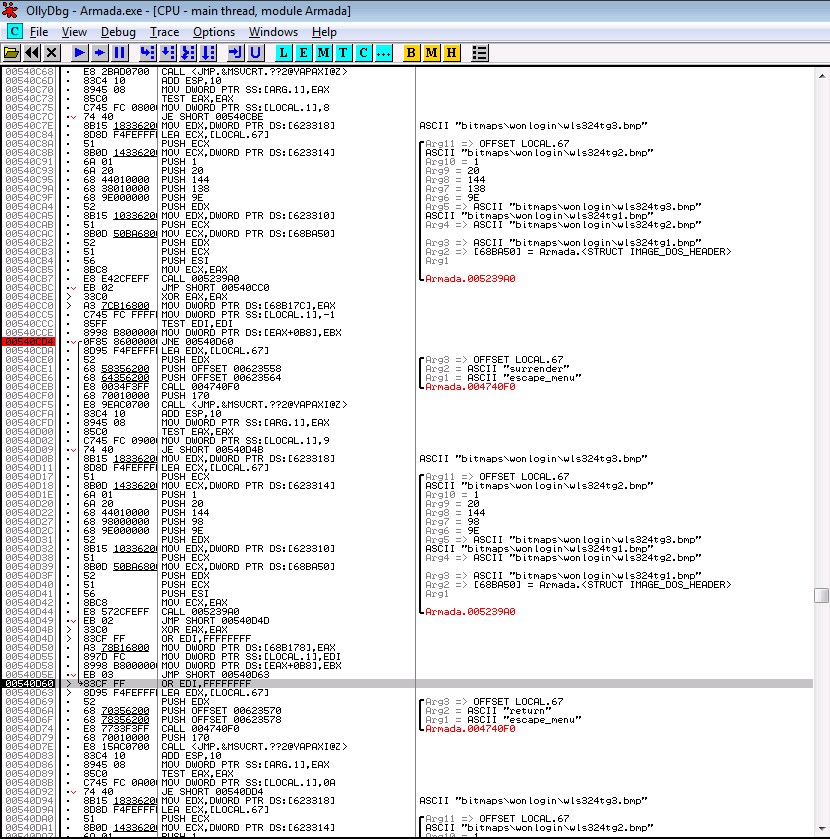
Notice that, for branches 2 and 3, the same “test edi,edi” instruction is executed prior to the jump instructions. Searching online, we find that comparing a register with itself is a common way to test whether that register is zero. Notice also, that the second branch is the “JE” (jump if equal, or in this case, jump if zero) instruction, while the third branch is a “JNE” (jump if not equal, or in this case, jump if not zero) instruction. In other words, we’ll never execute both the “save game” and “surrender” code paths, the behavior we’ve seen exhibited by the game. Thus, we can surmise that we have located the point where the code decides which “version” of the menu to display. Furthermore, we deduce that the EDI register will be populated with zero during multiplayer mode, and non-zero during single player mode.
Patching the Menu Code
We can attempt to enable saving during multiplayer games by changing the two branching instructions we’ve identified. We’ll replace the first conditional branch with NOPs. The second conditional branch we’ll replace with an unconditional branch to the same location. This way, we’ll always execute the “single player” code and never execute the “multiplayer” code. Note that this has the side effect of permanently disabling the “surrender” option (but this option is silly anyhow).
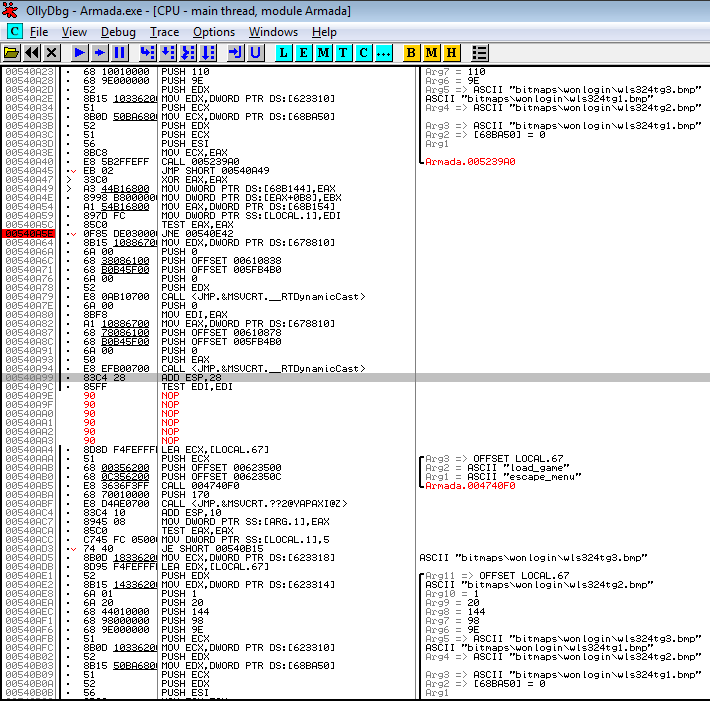
Saving and exporting our changes to Armada.exe, we find that the single player menu is displayed during a mutiplayer game!
Curiously enough, merely reconfiguring the WM_INITDIALOG code (as we have done above) allows the save game feature to work (during multiplayer games) without any additional patches to the game executable. We were lucky!
Notes: Using the Multiplayer Save Functionality
While we now can save multiplayer games, the “load game” functionality inherently loads only single player games. However, after saving a multiplayer game, we can get around this particular problem by converting the save file to a new custom STA map. Then, we can have all of the game’s previous players join a new multiplayer game, enter the same settings as before, and load this custom map (with “map units” enabled). Experiments have shown that this is typically successful (although it requires a bit of trial and error).
Converting from a save file to a map is relatively easy – copy the .sav file from the “save” folder to the “addon” folder and rename the file to have a .bzn extension. Then, make a copy of the parent map’s .mdf and .bmp files and save them with the same name as the .bzn file.
By far, it’s not a perfect system; however, it can and does usually work! Unfortunately, on my systems, the multiplayer games sometimes desynchronize so quickly that even saving and reloading does not make multiplayer playable. (Oh well.)
Conclusion
If I’ve held your attention for this long, you should now have the tools within your “IT arsenal” to consider patching any of your computer games that either semi-work or don’t work at all on modern systems. If this mini-series inspires you to do so, please drop me a line (in the comments fields below) and let me know how your experience went and what game you patched.
Happy reverse engineering!
Patch Files
This section lists the combined sum of patches made throughout all three parts of this mini-series. Due to copyright issues, I can’t post a directly-downloadable version of the modified Armada.exe; however, I’ve made the patches available in various formats.
Checksums
The checksums for the modified Armada.exe are included below:
- Armada.exe (with all patches)
- File size: 2502701 bytes
- sha1 hash: 3464b9865855509fbbe99c1ad1cb134b45ef8eeb
- sha256 hash: 21759635fd5daf9856f663b70dee6b2989d88967cff3c774f18d5b4221edadd7
Downloadable Patch Files
I’ve made my patches to Armada.exe available via a few file formats. You need only ONE of the following files to patch your executable (choose the patch file that suits your patching tool):
- xdelta patch: Armada_exe_patches.xdelta
- Apply using “xdelta patch Armada_exe_patches.xdelta Armada.exe Armada.exe.new”
- (You’ll need cygwin or a Linux environment.)
- bsdiff patch: Armada_exe_patches.bsdiff
- Apply using “bspatch Armada.exe Armada.exe.new Armada_exe_patches.xdelta”
- (You’ll need cygwin or a Linux environment.)
- mspatch patch: Armada_exe_patches.mspatch
- Apply using “apatch Armada_exe_patches.xdelta Armada.exe Armada.exe.new”
- (You’ll need apatch.exe from the Windows Platform SDK.)
If you don’t understand how to make use of any of the patch files, feel free to drop me a line.
Patch Listing
Should you wish to make the edits to Armada.exe yourself using a hex editor, I have included a patch listing below:
Offset    Original  New
000CAC1A  04        08
000CAD2C  84        50
000CAD2D  C0        EB
000CAD2E  0F        54
000CAD2F  85        90
000CAD30  49        90
000CAD31  FF        58
000CAD32  FF        EB
000CAD33  FF        31
000CAD65  90        84
000CAD66  90        C0
000CAD67  90        0F
000CAD68  90        85
000CAD69  90        10
000CAD6A  90        FF
000CAD6B  90        FF
000CAD6C  90        FF
000CAD6D  90        EB
000CAD6E  90        C5
000CAD75  90        58
000CAD76  90        EB
000CAD77  90        B9
000CAD83  90        FF
000CAD84  90        B5
000CAD85  90        EC
000CAD86  90        FD
000CAD87  90        FF
000CAD88  90        FF
000CAD89  90        EB
000CAD8A  90        08
000CAD93  90        8D
000CAD94  90        8D
000CAD95  90        EC
000CAD96  90        FD
000CAD97  90        FF
000CAD98  90        FF
000CAD99  90        EB
000CAD9A  90        67
000CAE02  90        E8
000CAE03  90        B9
000CAE04  90        E3
000CAE05  90        FF
000CAE06  90        FF
000CAE07  90        83
000CAE08  90        F8
000CAE09  90        14
000CAE0A  90        EB
000CAE0B  90        17
000CAE23  90        0F
000CAE24  90        83
000CAE25  90        4C
000CAE26  90        FF
000CAE27  90        FF
000CAE28  90        FF
000CAE29  90        EB
000CAE2A  90        29
000CAE54  90        8F
000CAE55  90        85
000CAE56  90        EC
000CAE57  90        FD
000CAE58  90        FF
000CAE59  90        FF
000CAE5A  90        E9
000CAE5B  90        24
000CAE5C  90        FF
000CAE5D  90        FF
000CAE5E  90        FF
001005FC  6A        90
001005FD  00        90
001005FE  E8        90
001005FF  AD        90
00100600  28        90
00100601  F4        90
00100602  FF        90
00100603  83        90
00100604  C4        90
00100605  04        90
00140A9E  0F        90
00140A9F  84        90
00140AA0  98        90
00140AA1  01        90
00140AA2  00        90
00140AA3  00        90
00140CD4  0F        E9
00140CD5  85        87
00140CD6  86        00
00140CD9  00        90
Hi, readed your post. awesome, it opened my eyes.
saved to mi hdd. thank you!
Hi 🙂 I downloaded xdelta patch: Armada_exe_patches.xdelta and cygwin….
So how can I apply this patch to Armada.exe?? Thanks in advance
Hi! Thanks for your interest. I’ll try to give you a quick outline:
xdelta --helpAnd press enter. You should (hopefully) see a brief explanation of the xdelta command and its usage. If you instead see
-bash: xdelta: command not found, then you should quit the cygwin terminal and re-run the cygwin setup. This time, during setup when you’re prompted to select which packages to install, search for ‘xdelta’ and add the corresponding package.xdelta patch Armada_exe_patches.xdelta Armada.exe Armada.exe.newand press enter. If the command was successful, a new (patched) file called Armada.exe.new should have been created.
Hopefully that should be it!
Hello Aaron,
First of all i would like to thank you and others that have attained the skills to remedy the hassels with running Armada 1 and other “Great Games” on later systems.
That being said, I’ve followed the instructions given on how to install the patches but I’ve come across a problem. I’m having a problem with the patches. I downloaded the cygwin64 program and had no difficulties installing on my computer with win 10 home premium. but their is no yourusernamehere folder, so I did create one. But when I go to download the patch Armada_exe_patches.xdelta or Armada_exe_patches.bsdiff, I get a page with the patch code written on it and it wont’t download as a file. So could u help with this plz. I have tried to copy the patches and saving them in different formatt. This causes the cygwin program to print, “xdelta: Armada_exe_patches.xdelta: file or directory not found. I’ve also tried without the yourusernamehere folder and still the same problem.
Thanks,
Agent J
Hey, can’t believe I never found these posts until now, I’ve been trying to play Armada 1 for YEARS. Unfortunately these patches didn’t help me, but this patch:
http://armadafiles.com/files/armada/mods/patches/star-trek-armada-patch-1-3-project/details
allows me to play on my Windows 7 x64 laptop just fine. If I understood Ollydbg more, I’d like to continue debugging Armada 1 so it could run on in Windows 8.1
I wish I knew enough about coding to apply this patch. I miss playing this game… 🙁
Hi David,
While I don’t have an ETA as of yet, I and a few others are currently hoping to upgrade the unofficial “Star Trek Armada 1.3” patch that was released by another party a number of years ago. I didn’t know about it at the time, but the 1.3 patch fixed a few of the same bugs that I worked on. It also added some other features.
Basically, we’re looking to possibly “rebase” my patches on top of the 1.3 patch, and also add a fix for Windows 10 (which currently has trouble running Armada even with 1.3). We’d probably make a new installer to automate the patch installation process.
I’ll try to remember to drop you a note if anything comes of it.
Thanks Aaron, that would be awesome. If you need a beta tester let me know… 😀
This would be very cool. I do miss playing Armada.
I will be happy to be a tester as well.
Hello I’ve tried both the Xdelta patch and the bsdiff patch on cygwin but neither one worked. Is it because I’m on a windows 8 machine? Also any idea when and where I could get a hold of the new 1.3 patch you were working on?
Hi Benjamin,
I’m sorry! I got sidetracked with a charity project at my church and I haven’t had time to continue working on the windows 10 patch. I imagine Windows 8 might have the same problem as Windows 10 but I’m not sure. Anyway, I hope to resume efforts in a month or two.
Aaron
That would be super cool I you could
Please oh please oh please help us get Armada working on Windows 10. What you’ve done here is spectacular!!
I can’t get apatch Armada_exe_patches.xdelta Armada.exe Armada.exe.new. When I go to page, all I see is gibberish like “PA19àÇCR@ |0ƒ-`¨mî€0¯t•€€|„rc”Ô ±E5n ‚Âè,N,Pù-„æ+²s¾;;ôû2õT”@P 2ðGà”
lone_wolf769@hushmail.com
I created a patch for Star Trek Armada 1 and Windows 10. The game is fully playable in high resolution on Windows 10. You can check out the patch here: https://github.com/elishacloud/dxwrapper/wiki/Start-Trek-Armada-1
Note: some of the neat animation in the menu is missing but the game is fully playable. I was able to get the animation in the menus to work perfectly on Windows 10 but I cannot get the game to run in high resolution and get the animation working. I might go back and do a full fix for it later.
Hey! Nice job!
@elishacloud Thank you so much for your fix. I tried everything and came across your comment and it works perfect first try. You are awesome. I can now play Armada 1 perfectly on Windows 10.
@elishacloud: I have an Asus Ultrabook with Windows 10 and I did everything you listed for making STA run in Win10 but it crashes when I load a Multiplayer map for playing against the computer. Am I doing something wrong? Thanks
i have it running as a portable app. it works 100 percent at work. (i tried it just to check). so works 100 percent at work, but the exact same files do not work on my home win10 computer. they are both win10 64bit versions of windows. some fundamental setting is different. or there is some dependency that i am unaware of. i would really really like to figure out this problem and get this to work and understand the nature of the issue. if anyone can please help, i would greatly greatly appreciate it.
OK, this may be a long shot and maybe this post won’t be noticed by Aaron,
but while debugging Armada.exe is it possible to change some of gameplay settings??
Hi Zdravko!
I notice you 🙂
But I’m not 100% sure what you mean by ‘gameplay settings’. If you’re talking about unit strengths, technology attributes, and the like then – yes – a bunch of that is configurable via various .odf files. You basically have to find the “original” versions of the files (downloadable online I seem to recall), make the edits, and then put the edited versions in the ‘addon’ directory. But yeah, there’s no editing of the .exe file required in many of such cases 🙂
Honestly I didn’t expect you will notice comment, so thank you for that and thanks Vukasin above to hinting me this thread 🙂
Anyway, I’m aware of ODFs and I edit my Armada game for years now, but this “setting” may require editing Armada.exe (and maybe some other files too like “label.map” etc.). I’ll try to explain without too much typing xD
As you know, in Instant Action / Multiplayer you can choose 4 races to play with by default (Federation, Klingon, Borg, Romulan). On the other hand, in missions you will encounter Dominion, Ferengi, Cardassians.. There is also races.odf where you can see all races available in game.
So what I want is (and I don’t know how to do it) to modify Armada.exe file to enable choosing MORE than 4 default races in Instant Action. After that, is easy to edit odf files that new races work properly in game.
I opened Armada.exe with Ollydbg and there you can find items from game setup screen where you can choose race, teams, maps.. I even tried to add e.g. “dominion” string in lines where races are, but again I can choose only 4 default races in game..
So can you take a look at this please?? Please, don’t direct me to Armada 2 where are 6 playable races.. I find it pretty crappy sequel actually I would like to play Armada 1 in future too..
Thanks in advance for reply!
Hah. I too dislike Armada 2. Armada 1 was so much more interesting play due to the superpowers having a major effect.
I’m not actually in ‘Armada 1 reverse engineering’ mode right now, but I’ll try to remember to take a look at the number of races next time I’m disassembling/hacking Armada. The other thing you could do is try to do this yourself using my blog posts as a bit of a guide for the basics of reverse engineering 🙂
OK, no problem, just please don’t forget me lol xD.
Can you put some link so I can take a look at ‘reverse engineering’??
I just got back into modding this game, i to would love to know how to expand the race amount and drop box.